Akaunting Installation on Arch Linux with Nginx
Briefly, Akaunting is an open-source web-based accounting software suitable for small businesses. I managed to install it after some hitting some initial roadblocks (i.e., the notorious issue of being stuck on step 2 of database installation as seen here and here , error connecting to database as seen here, here and here) and am trying to document my steps to get a working installation up and running on a Linux machine, specifically on the distro ArchLinux.
Prerequisites
Akaunting runs on PHP7 at the time of this writing. For arch-users, the following packages are required.
php7
php7-fpm
php7-gd
A working database is also required, users may refer to setting up MySQL databases respective to their operating systems. I will be using MariaDB for my installation, with setup instructions easily found here. I will assume there is a working MySQL installation on the host 10.0.0.2 and we will be on the host 10.0.0.1.
To start the php7-fpm process, mind the brackets with the correct version:
systemctl start php-fpm7
Of course, if Akaunting does further on support PHP8, please change accordingly. (supposedly, the current default php package on Arch is PHP8, in that case, just systemctl start php-fpm will do, and likewise applies to the package names to be installed as mentioned. (e.g., php php-fpm php-gd)
Setting up the Database
To setup the database, login as admin to the existing MySQL installation via mysql -u root while accessing 10.0.0.2. We need to create a database and a privileged user for said database. The database should use utf8 as mentioned in this thread. I will use 'akaunting' for the database name.
create database akaunting character set utf8 collate utf8_general_ci;
Create a user with remote access (or local if your database is on the same machine) and grant privileges of 'akaunting' to the user. I will be using the username 'aku'.
create user 'aku'@'%' identified by '<YOUR OWN PASSWORD>';
grant all privileges on akaunting.* to 'aku'@'%' with grant option;
flush privileges;
If your database is remote, please try to login remotely first to test that you can indeed connect remotely. You should see "akaunting" in the list.
mysql -u aku -h 10.0.0.2 -p
...
show databases;
Installation
To install, access 10.0.0.1 where you want Akaunting setup (stay on same machine if you want both of them to be on the same machine). Then download the stable version to the directory you want it installed. I will be doing it on the command-line interface, and install it at /srv/http/ak/
mkdir /srv/http/ak
wget -O /srv/http/ak/latest.zip https://akaunting.com/download.php?version=latest
unzip /srv/http/ak/latest.zip
chown -R http. /srv/http/ak
Nginx Setup
While this setup uses Nginx for serving, you may choose to use Apache or whatever that you think you know best. Do ignore this section if you already have a working web server which can handle php scripts.
For Arch users, you can easily do pacman -S nginx && systemctl start nginx to install and run the server app. Once installed, create a configuration file /etc/nginx/sites-available/akaunting.conf
# file /etc/nginx/sites-available/akaunting.conf
server {
        listen 80;
        server_name your.server.domain;
        root /srv/http/ak;
        add_header X-Frame-Options "SAMEORIGIN";
        add_header X-XSS-Protection "1; mode=block";
        add_header X-Content-Type-Options "nosniff";
        index index.html index.htm index.php;
        charset utf-8;
        #allow 192.168.40.0/24; # allow internal LAN acccess
        #deny all;
        location / {
                try_files $uri $uri/ /index.php?$query_string;
        }
        # Prevent Direct Access To Protected Files
        location ~ \.(env|log) {
                deny all;
        }
        # Prevent Direct Access To Protected Folders
        location ~ ^/(^app$|bootstrap|config|database|overrides|resources|routes|storage|tests|artisan) {
                deny all;
        }
        # Prevent Direct Access To modules/vendor Folders Except Assets
        location ~ ^/(modules|vendor)\/(.*)\.((?!ico|gif|jpg|jpeg|png|js\b|css|less|sass|font|woff|woff2|eot|ttf|svg).)*$ {
                deny all;
        }
        error_page 404 /index.php;
        # Pass PHP Scripts To FastCGI Server
        #location ~ \.php$ {
               fastcgi_split_path_info ^(.+\.php)(/.+)$;
               fastcgi_pass unix:/var/run/php7-fpm/php-fpm.sock;
               fastcgi_index index.php;
               fastcgi_param SCRIPT_FILENAME $document_root$fastcgi_script_name;
               include fastcgi_params;
        }
        location ~ /\.(?!well-known).* {
                deny all;
        }
}
Be sure to check restart and check nginx is running without issue after adding in the configuration.
PHP-FPM Setup
Install the required PHP modules and edit /etc/php7/php.ini, ensure you have the following extensions enabled.
extension=bcmath
extension=gd
extension=mysqli
extension=pdo_mysql
extension=zip
Start/Restart php-fpm7.service. At the time of this writing, Akaunting needs to use PHP in the command line. but php7 comes only with the php7 binary. Do the following to allow Akaunting to use php7 in the command line.
ln -s /usr/bin/php7 /usr/bin/php
Then, for sanity check, run php -m and verify that the extensions listed in Akaunting's requirement are installed. Once you’re done, we are now set for the final step.
Web Installation
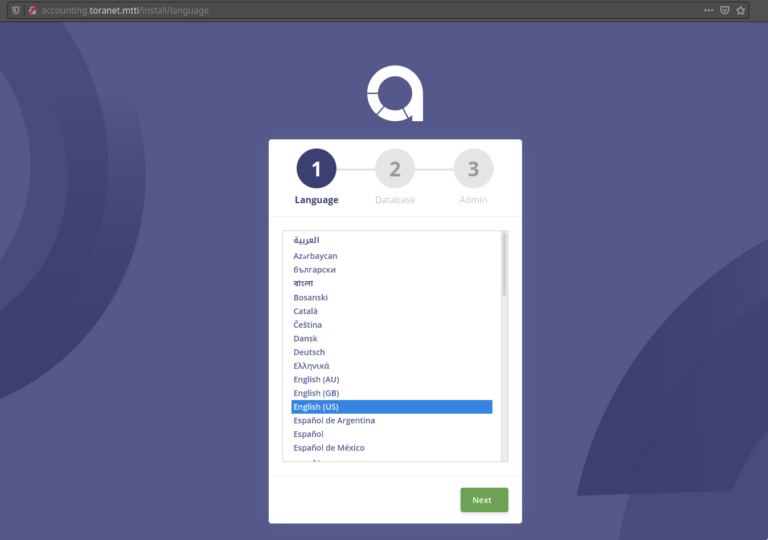
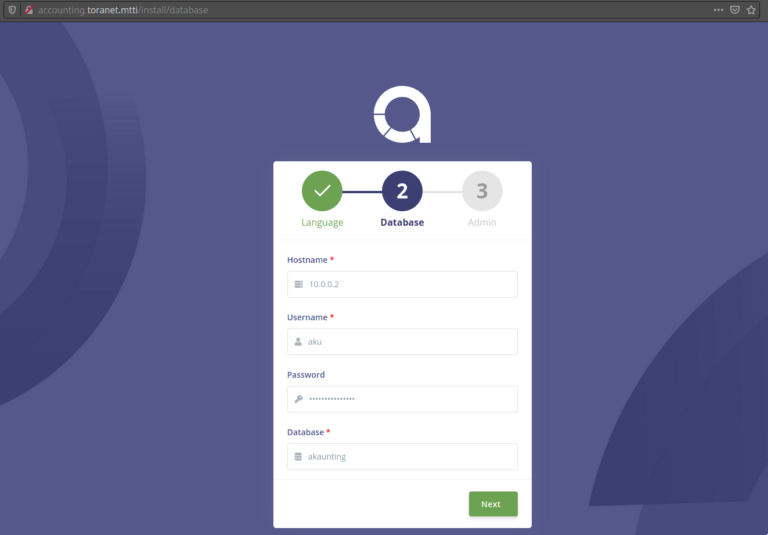
Navigate to http://your.server.domain/ak from your browser. Select your language and click 'Next'. For the second step, the only success so far I have is that HostName should really be an IP-address. This means EVEN if you are on the same machine, don’t use the default provided localhost but instead type in 127.0.0.1 or ::1. Enter your database username and password as well as the database name, then click 'Next'.
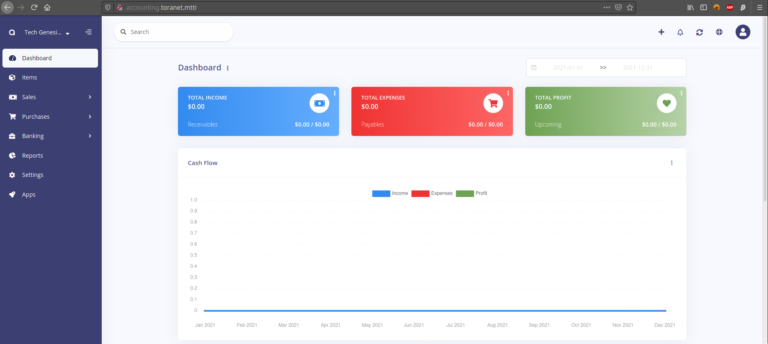
If everything goes well, you will be greeted by the final stage. Just key in your details and hit 'Next'. You will then go through a wizard for the accounting particulars of your business (i.e., Tax Number, Currency, etc.) and once done, the setup is complete.
End Note
The setup was done for HTTP connection only. Please enable HTTPS by changing your nginx configuration. This walkthrough will not cover that.